5.
Operating your S-4 in the
User Mode
There are times when the material in the Supply Hopper does not lend
itself
very well to the “Automatic” mode of operation. Materials that are
“sticky”
or inconsistent can “fool” the controller in the automatic mode. These
materials usually run better in the “User” mode. When using the
Controller
in this mode, the operator must enter all of the operating parameters
using
the target weight up and down arrow switches.
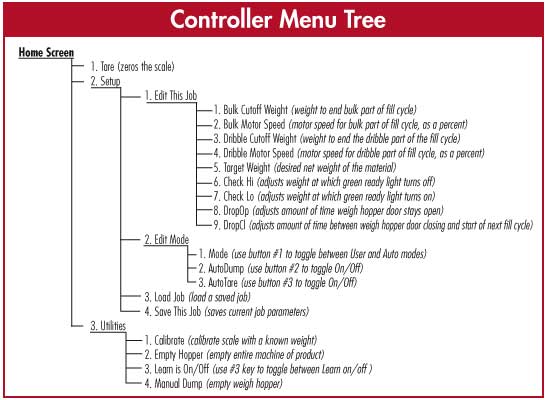
The
Fill Process
The S-4 Controller in User mode fills a container as follows. It fills
the major portion of the container at a high speed (Bulk Speed) until
it
reaches a certain weight (Bulk Cutoff). It then fills the remainder of
the container at a slower speed (Dribble Speed) until it reaches a
terminal
weight (Dribble Cutoff). The terminal weight is usually a bit less than
the final weight because a small amount of material falls into the
container
after the vibrator motor turns off.
For example, if the operator was filling bags with 5 pounds of rice,
he/she might program the S-4 Controller to fill the first 4.75 pounds
at
a high vibrator motor speed. The Bulk Cutoff would be 4.75 pounds and
the
Bulk Speed might be 50% of full motor speed. The remaining pound of
material
might then get filled at a lower vibrator motor speed. The operator
might
program a Dribble Speed of 20% and a Dribble Cutoff of 4.98 pounds
guessing
that the final 0.02 pounds will fall into the container after the
controller
turns off the vibrator motor.
|
|
The
following is a step-by-step description
of operating the S-3 in User Mode:
- Turn on the
Controller
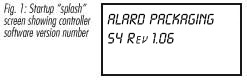
Every time the controller is turned on using the power switch, the
LCD screen displays a short “splash” screen (fig. 1) that indicates the
model number and revision number. You should see a line like “S4 Rev
1.06”.
In this example, the first part of the message “S4” would tell you that
the controller is setup for the Model S-4 machine. If this first part
shows
“S3”, call Alard Equipment Corp for instructions on changing it to
“S4”.
The “Rev 1.06” part of the message is indicating the software revision
in the controller (1.06 in this example). Write this down so that if
you
need to call Alard Equipment Corp. with a question, they will know what
machine you have.
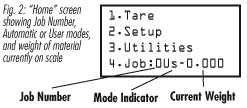
Once the “splash” screen has past, the “Home”
screen (fig. 2) will show
a short menu, a “Job number”, an indication of whether the current job
is “automatic” or “manual”, and the weight indicated by the scale.
The “Job number” is the job currently being used. The controller can
store several jobs that the operator has setup and saved in its
internal
memory and the operator can recall those jobs later on. A Job is a set
of parameters that tell the controller how to fill a particular
container
with a particular amount of material. All jobs are saved when the power
is removed.
There are 2 characters after the job number.
They will either be “Au”
indicating that the currently loaded job is an “automatic” mode job or
“Us” indicating the current job is a “User” mode job. An automatic job
means the controller will constantly adjust the job parameters during
operation
and a user job will use fixed operator supplied parameters and will
make
no adjustments.
The weight of the material currently in the
Scale/Accumulation Hopper
will be shown on the bottom right side of the LCD display. If you
connected
the scale you should be able to make this weight change by pressing on
the Scale/Accumulation Hopper.
|
|
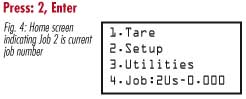
- Load a Job
We will load job number 2 for this example. Load the current job number
2 from the controller’s memory by pressing “Home 2,3” to get to the
load
job screen (fig. 3). You will be asked to enter the job number you want
to load. Press “2” and then “Enter” to load the parameters currently
saved
in job#2. After hitting “Enter” you will be returned to the main
screen.
Notice that the bottom line of the display starts with “Job: 2” (fig.
4).
This is telling you that job number 2 is being used.
|

|
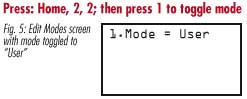
- Setup
Operating Modes
Now we need to tell the controller to use “user” mode for this job.
This forces the controller to use operator supplied parameters while it
is running. Press “Home 2,2” to get to the “Edit Modes” menu (fig. 5).
The first item in this menu should be “Mode”. By pressing the “1” key
you
can toggle the mode from “Auto” to “User”. Toggle the mode to indicate
“User”
While you are in this menu, notice the other
menu items. Press the “2”
key o toggle the “AutoDump” setting to “Off”. Use the “3” key to toggle
the “AutoTare” to “Off”.
Once you have made the above changed to the
Modes, press Home to go
back to the home screen.
|
|
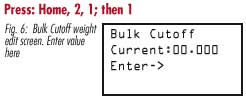
- Set the
Bulk Cutoff Weight
If we are running the job described above we will want to enter the
bulk cutoff weight of 4.75 lbs. Press “Home 2,1” to get to the
parameter
edit list. Press the “1” key to edit the bulk cutoff weight (fig. 6).
If
while entering the parameter you make a mistake, you can press the C/CE
key to clear your entry and reenter the parameter. Enter the desired
bulk
cutoff weight and press enter when you are done. (Your Model S-4 comes
calibrated in pounds. If you wish to change to the metric system, see
the
section on calibration , listed below.) You will be returned to the
parameter
edit list. You can use the arrow keys to view all of these parameters.
Use the “Home” key to return to the main screen.
|
|
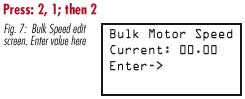
- Set the
Bulk Speed
Press “Home 2,1” to get to the parameter edit list if you are not
already
in it. Press the “2” key to edit the bulk speed (fig. 7). If while
entering
the parameter you make a mistake, you can press the C/CE key to clear
your
entry and reenter the parameter. Enter the desired bulk speed and press
enter when you are done. (Both Bulk and dribble speeds are displayed as
a percent of 100%, full speed.) You will be returned to the parameter
edit
list. You can use the arrow keys to view all of these parameters. Use
the
“Home” key to return to the main screen.
|
|
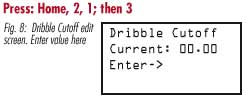
- Set the
Dribble Cutoff Weight
Press “Home 2,1” to get to the parameter edit list if you are not
already
in it. Press the “3” key to edit the dribble cutoff weight (fig 8). If
while entering the parameter you make a mistake, you can press the C/CE
key to clear your entry and reenter the parameter. Enter the desired
dribble
cutoff weight and press enter when you are done. You will be returned
to
the parameter edit list. You can use the arrow keys to view all of
these
parameters. Use the “Home” key to return to the main screen.
|
|
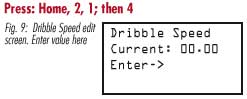
- Set the
Dribble Speed
Press “Home 2,1” to get to the parameter edit list if you are not
already
in it. Press the “4” key to edit the dribble speed (fig. 9). If while
entering
the parameter you make a mistake, you can press the C/CE key to clear
your
entry and reenter the parameter. Enter the desired dribble speed and
press
enter when you are done. You will be returned to the parameter edit
list.
You can use the arrow keys to view all of these parameters. Use the
“Home”
key to return to the main screen.
|
|
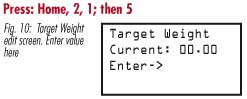
- Set the
Target Weight
Press “Home 2,1” to get to the parameter edit list if you are not
already
in it. You can use the up and down arrow keys to view all the
parameters.
Press the “5” key to edit the target weight (fig. 10). If while
entering
the parameter you make a mistake, you can press the C/CE key to clear
your
entry and reenter the parameter. Enter the desired target weight and
press
enter when you are done. You will be returned to the parameter edit
list.
You can use the arrow keys to view all of these parameters. Use the
“Home”
key to return to the main screen.
|
|
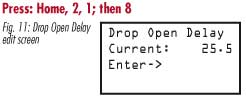
- Set the
Drop Gate Open Time
The drop gate open time is the time that the controller leaves the
gate open. This and the drop gate close time can be adjusted to
optimize
cycle time. Press “Home 2,1” to get to the parameter edit list if you
are
not already in it. You can use the up and down arrow keys to view all
the
parameters. Press the “8” key to edit the drop gate open time (fig.
11).
If while entering the parameter you make a mistake, you can press the
C/CE
key to clear your entry and reenter the parameter. Enter the desired
open
time and press enter when you are done. You will be returned to the
parameter
edit list. You can use the arrow keys to view all of these parameters.
Use the “Home” key to return to the main screen.
- Set
the Drop Gate Close Time
Press “Home 2,1” to get to the parameter edit list if you are not
already
in it. You can use the up and down arrow keys to view all the
parameters.
Press the “9” key to edit the drop gate close time (fig. 12)
|

|
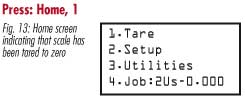
- Tare the
Scale
With nothing on the Scale, press”Home 1” (fig. 13). The display should
read “0.000”. This removes any offset in the scale so that anything you
now put on the scale will be weighed from a value of zero.
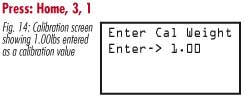
- Check
Calibration of the Scale
Place a known weight on the scale and see if it is accurate. If it
is not, you must “calibrate the scale”. To calibrate the scale, first
tare
the scale (see above), then put an object of known weight on the scale.
Press “Home 3,1” to get to the calibrate screen (fig. 14). You will be
prompted to enter the weight of the object you put on the scale. Enter
the weight of the object and press “Enter”. You will be returned to the
main screen where you should see the correct weight for the object on
the
scale.
|
|
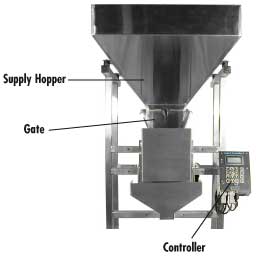
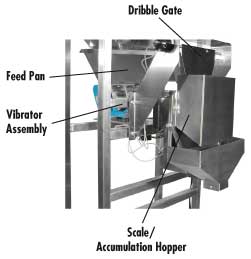
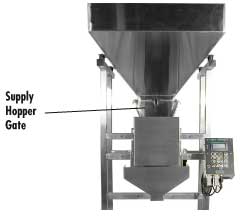
- Adjust the
Supply Hopper Gate
Set the height of the Supply Hopper Gate to something that will
restrict
the material flowing from the Supply Hopper to the Feed Pan so that it
will flow smoothly. You may have to adjust this later on.
- Put
some material in the Hopper
Put your material in the Hopper. It should flow down into the Feed
Pan/Vibrator. You may have to push some material down into the Feed Pan
to get things started.
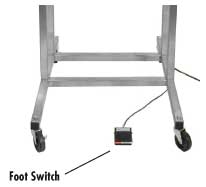
- Press
the Foot Switch
Press the Foot Switch to start the fill cycle. The “Drop Gate” will
open and close and the vibrator will start. If you have the optional
Feed
Pan Gate, it will open. The Controller will use the supplied parameters
to fill the accumulate hopper. When the accumulator has been filled the
display will indicate the weight of the material in the Accumulation
Hopper.
|
|
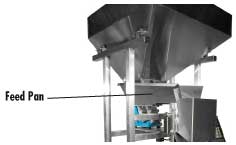
- Fine Tuning
Material Flow
If you find the vibrator is running very fast and/or it takes a long
time for the accumulator to fill, you may have the Supply Hopper Gate
too
restrictive for the material in the Supply Hopper. On the other hand,
if
the container fills quickly but is not very accurate, the Supply Hopper
Gate may not be restrictive enough and should be lowered. Generally the
Feed Pan should contain one layer of material when the container is
filling.
For example, if you are filling a container with beans, you should
observe
a continuous flow of beans in the Feed Pan, one bean deep that flows
smoothly
and evenly. If there are gaps or open spots where you can see the
bottom
of the Feed Pan, you should open up the Supply Hopper Gate.
- Save
the Job
You should now save the job so that the next time you turn the machine
on, all the current operating parameters are saved. The S-4 does not
automatically
save jobs. You must save the job. To do this simply press “Home 2,4”
(fig.
15.) This will save all of the current parameters so that the next time
you load this job from the controllers memory, it will operate just as
it did the last time you saved the job.
Back to Top |


|
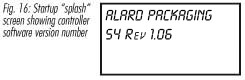
6.
Operating your S-4 in Automatic
Mode
You are now ready to turn your S-4 on for the first time. We will first
setup a new job filling 0.50 lb containers in “automatic” mode. This
mode
lets the controller adjust itself for optimum performance.
- Turn on the
Controller
Every time the controller is turned on using the power switch, the
LCD screen displays a short “splash” screen (fig. 16) that indicates
the
model number and revision number. You should see a line like “S4 Rev
1.06”.
In this example, the first part of the message “S4” would tell you that
the controller is setup for the Model S-4 machine. If this first part
shows
“S3”, call Alard Equipment Corp for instructions on changing it to
“S4”.
The “Rev 1.06” part of the message is indicating the software revision
in the controller (1.06 in this example). Write this down so that if
you
need to call Alard Equipment Corp. with a question, they will know what
machine you have.
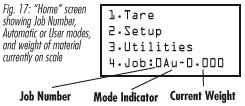
Once the “splash” screen has past, the “Home”
screen (fig. 17) will
show a short menu, a “Job number”, an indication of whether the current
job is “automatic” or “manual”, and the weight indicated by the scale.
The “Job number” is the job currently being used. The controller can
store several jobs that the operator has setup and saved in its
internal
memory and the operator can recall those jobs later on. A Job is a set
of parameters that tell the controller how to fill a particular
container
with a particular amount of material. All jobs are saved when the power
is removed.
There are 2 characters after the job number.
They will either be “Au”
indicating that the currently loaded job is an “automatic” mode job or
“Us” indicating the current job is a “User” mode job. An automatic job
means the controller will constantly adjust the job parameters during
operation
and a user job will use fixed operator supplied parameters and will
make
no adjustments.
The weight of the material currently in the
Scale/Accumulation Hopper
will be shown on the bottom right side of the LCD display. If you
connected
the scale you should be able to make this weight change by pressing on
the Scale/Accumulation Hopper.
|
|
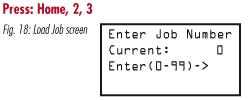
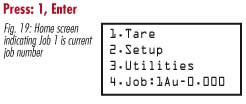
- Load a Job
We will load job number 1 for this example. Load the current job number
1 from the controller’s memory by pressing “Home 2,3” to get to the
load
job screen (fig. 18). You will be asked to enter the job number you
want
to load. Press “1” and then “Enter” to load the parameters currently
saved
in job #1. After hitting “Enter” you will be returned to the Home
screen
(fig. 19). Notice that the bottom line of the display starts with “Job:
1”. This is telling you that job number 1 is being used.
|
|
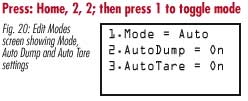
- Setup
Operating Modes
Now we need to tell the controller to use “automatic mode” for this
job. This allows the controller to try and optimize the running
parameters
while it is running. Press “Home 2,2” to get to the “Edit Modes” menu
(fig.
20). The first item in this menu should be “Mode”. By pressing the “1”
key you can toggle the mode from “Auto” to “User”. Toggle the mode to
indicate
“Auto”
While you are in this menu, notice the other
menu items. Press the “2”
key to toggle the “AutoDump” setting to “Off”. Use the “3” key to
toggle
the “AutoTare” to “Off”.
Once you have made the above changed to the
Modes, press Home to go
back to the home screen.
|
|
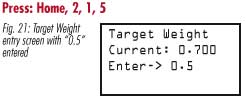
- Set Target
Weight
Since we are going to run in “Automatic” mode for this example, the
only parameter we need to adjust is the target weight. Press “Home
2,1,5”
to get to the target weight entry screen (fig. 21). This will prompt
you
for a target weight. Enter “0.5” followed by the “Enter” key. You will
now be returned to the run parameter screen which shows all of the
operating
parameters. Since we will be running in “Automatic” mode you will not
have
to change any of these other items. You can uses the arrow keys to view
all of these parameters. Use the “Home” key to return to the main
screen.
|
|
- Turn On
"Learn" Mode
The last thing we need to do is to tell the controller to do a “Learn”
cycle. The learn cycle is done the first time a new job is run in
automatic
mode so the controller can get a “feel” for how the material flows. The
controller in actually learning on every cycle if it is running in
automatic
mode but for the very first cycle we will tell it to very carefully
learn
the characteristics of the material and how it flows.
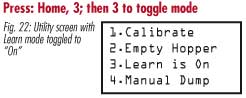
To tell the controller to “Learn” on the first
cycle press “Home 3”
to go to the “Utility” screen (fig. 22) and then press “3” to toggle
the
learn mode from “Off” to “On”. Press the “Home” key to return to the
opening
screen.
|
|
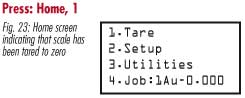
- Tare the
Scale
With nothing on the Scale, press “Home 1”. The display should read
“0.000” (fig. 23). This removes any offset in the scale so that
anything
you now put on the scale will be weighed from a value of zero.
- Check
Calibration of the Scale
Place a known weight on the scale and see if it is accurate. If it
is not, you must “calibrate the scale”. To calibrate the scale, first
tare
the scale (see above), then put an object of known weight on the scale.
Press “Home 3,1” to get to the calibrate screen (fig. 24). You will be
prompted to enter the weight of the object you put on the scale. Enter
the weight of the object and press “Enter”. You will be returned to the
main screen where you should see the correct weight for the object on
the
scale.
|

|
- Adjust the
Supply Hopper Gate
Set the height of the Supply Hopper Gate to something that will
restrict
the material flowing from the Supply Hopper to the Feed Pan so that it
will flow smoothly. You may have to adjust this later on.
- Put
some material in the Hopper
Put your material in the Hopper. It should flow down into the Feed
Pan/Vibrator. You may have to push some material down into the Feed Pan
to get things started.
- Press
the Foot Switch
Press the Foot Switch to start the fill cycle. The “Drop Gate” will
open and close and the vibrator will start. If you have the optional
Feed
Pan Gate, it will open. The Controller will very slowly increase the
power
to the vibrator as it “learns” or tries to judge how to best fill this
container with the given material. During the first cycle the
Controller
operates very slowly while it is trying to figure things out. When the
container has been filled the display will indicate the weight of the
material
in the Accumulation Hopper. You will notice that after the “Learn
Cycle”
each subsequent container will fill a bit more quickly. This is because
the controller is continuously trying to optimize the fill accuracy and
speed.
|
|
- Fine Tuning
Material Flow
If you find the vibrator is running very fast and/or it takes a long
time for the container to fill, you may have the Supply Hopper Gate too
restrictive for the material in the Supply Hopper. On the other hand,
if
the container fills quickly but is not very accurate, the Supply Hopper
Gate may not be restrictive enough and should be lowered. Generally the
Feed Pan should contain one layer of material when the container is
filling.
For example, if you are filling a container with beans, you should
observe
a continuous flow of beans in the Feed Pan, one bean deep that flows
smoothly
and evenly. If there are gaps or open spots where you can see the
bottom
of the Feed Pan, you should open up the Supply Hopper Gate.
- Re-entering
the Learn Cycle
If you make a major adjustment to the Supply Hopper Gate, you should
force the S-4 Controller to start the “Learn Cycle” from the beginning.
To do this, simply press “Home 3,3” to toggle the learn cycle on. You
can
usually make small adjustments to the Supply Hopper Gate without
re-entering
the “Learn Cycle”.
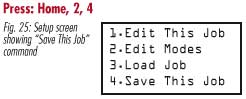
- Save
the Job
After operating several cycle, you should notice that the S-4 has
figured
out how to fill your containers quickly and accurately. You should now
save the job so that the next time you turn the machine on, all the
current
operating parameters are saved. The S-4 does not automatically save
jobs.
You must save the job. To do this simply press “Home 2,4” (fig. 25.)
This
will save all of the current parameters so that the next time you load
this job from the controllers memory, it will operate just as it did
the
last time you saved the job.
Back to Top |

|
7.
Calibrating your S-4
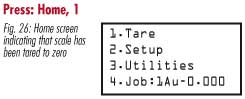
- Tare the
Scale
With nothing on the scale, press the “Home 1” to “tare” or zero out
the scale. After doing this, the display should read “0.000” (fig. 26).
- Put
a known weight on the Scale
Place a known weight on the scale and see if it is accurate. If it
is not, you must “calibrate the scale”. To calibrate the scale, first
tare
the scale (see above), then put an object of known weight on the scale.
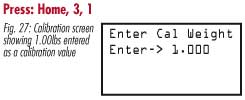
Press “Home 3,1” to get to the calibrate screen. You will be prompted
to
enter the weight of the object you put on the scale (fig. 27). Enter
the
weight of the object and press “Enter”. You will be returned to the
main
screen where you should see the correct weight for the object on the
scale.
*What’s a “known weight”? A known weight can be
any object—a book, a
shoe, your watch—as long as you know how much it weighs. The scale uses
this weight as a base reference for calibration. The accuracy of the
S-3
depends on how accurate your known weight is. If you know the weight of
your known weight within a few thousanths of a pound, the S-3 will be
much
more accurate in its measurements!
- Setting
the Scale to use Metric weight
To set the S-4 to use metric weights, simply use a known weight of
metric value to calibrate the scale. In other words, if you have a
known
weight object that weighs 1.000 kilogram (exactly!) then place that on
the scale during calibration (see section above) and enter “1.000” as
the
calibration value. The weight reading on the scale is now in kilos and
grams
Back to Top |
|